Step 8. Protect your documents and email: top 10 actions to secure your environment
The “Top 10 actions to secure your environment” series outlines fundamental steps you can take with your investment in Microsoft 365 security solutions. In “Step 8. Protect your documents and email,” you’ll learn how to deploy Azure Information Protection and use Office 365 Advanced Threat Protection (ATP) and Exchange Online Protection to help secure your documents and emails.
There are two types of risks to plan for when it comes to documents and emails. The first risk is that sensitive information will be distributed, often unintentionally, to others that should not have access to it inside or outside of your company. The second is that users in your organization will click links in phishing emails that trick them into giving up their credentials or open attachments that unleash malware. This blog will address ways to protect your company against both.
Azure Information Protection, which is part of Microsoft Information Protection, helps protect your sensitive information wherever it lives or travels. To set up Azure Information Protection, you need to discover where your sensitive information resides, classify and label the information based on its sensitivity, apply policy-based protection settings to control information access and sharing, and continuously monitor your sensitive data landscape. Then Office 365 Advanced Threat Protection (ATP) and Exchange Online Protection can help you protect your mailboxes, files, online storage, and applications against sophisticated attacks in real-time by setting up anti-phishing policies, enabling Safe Links, and setting up Safe Attachments.
Deploy Azure Information Protection to protect your sensitive documents and emails
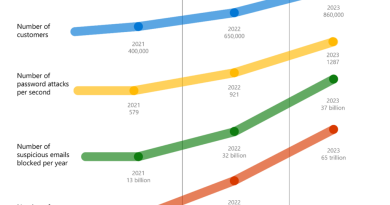
You may have hundreds or thousands of users creating and sharing documents and sending emails every day. Many files may not contain sensitive information, but the ones that have personal identifiable information, financial data, health-related information, or confidential company information could cause you serious reputational, financial, or legal harm if it gets into the wrong hands.
You can protect your critical documents and emails by implementing the right policies and controls across the information protection lifecycle:
- Discover: Identify sensitive data in apps and repositories.
- Classify and label: Classify data and apply labels based on sensitivity level.
- Protect: Apply policy-based protection actions including encryption and access restrictions.
- Monitor and remediate: Receive alerts flagging potential issues or risky behavior and take action.
You can download the Azure Information Protection—Deployment Acceleration Guide for a deeper overview of these phases and learnings from our engineering team. Read on for a high-level overview of the core concepts and resources.
Discover
The first phase in the approach is the discovery phase. In the discovery process, you gain visibility into the data that currently exists across your environment. To discover data in your on-premises file servers, run the Azure Information Protection scanner in discover mode. It will generate a report that catalogs data that has already been labeled, and the sensitive information types that Azure Information Protection has detected (Figure 1).
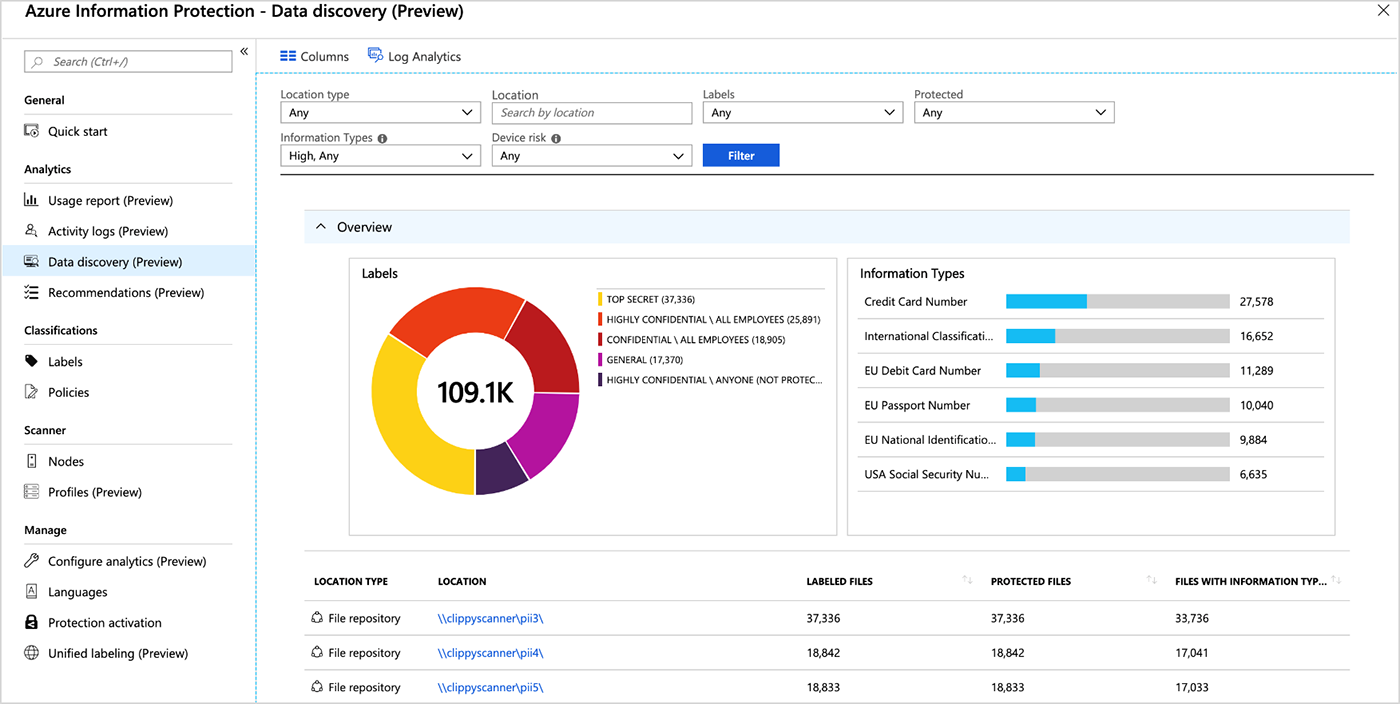
Figure 1. Azure Information Protection scanner report allows you to view overall volume and distribution of labeled files, and the types of sensitive data detected.
As discussed in Step 7. Discover shadow IT and take control of your cloud apps, you can use Microsoft Cloud App Security to scan files in cloud repositories to discover sensitive information. Once you’ve inspected data across your cloud repositories and on-premises repositories, you will move on to the classify and label phase.
Classify and label
Classification is determining the sensitivity of a document or email based on its content, and labeling is the application (either automatically or manually) of a sensitivity label, such as “Highly Confidential.” Azure Information Protection provides a recommended default label taxonomy in new tenants that can be modified for use by your organization. We also provide an online example of our current taxonomy that was developed by Microsoft over years of testing. We recommend using this taxonomy if your organization does not already have one established. If your organization has its own taxonomy or you plan to create one, the default label names in Azure Information Protection are easy to change or modify. It’s important not to overcomplicate your taxonomy, so review the Azure Information Protection—Deployment Acceleration Guide for guidance on how to develop your taxonomy.
Labels persist with files even when the files are shared or moved, ensuring that protection travels with the document. There are four options for applying labels:
- Apply manually by users.
- Apply a default label automatically to all new documents.
- Recommend labels based on the data detected.
- Apply labels automatically based on pre-defined classification and policies.
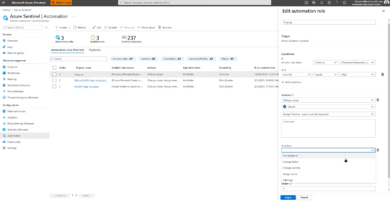
If you want users to apply labels manually, you can make it easy for them by automatically applying a default label to all new documents. In our default taxonomy, this would be the “General” label. A default label of “General,” which doesn’t apply encryption, allows anyone to view and edit the document, which may be a reasonable baseline for many documents in your organization. Users will need to think about applying a higher sensitivity label, such as “Confidential,” when they’re dealing with more sensitive data. We recommend that you enable the Azure Information Protection policy setting, which requires users to justify and explain why they lowered a classification level or removed a label (Figure 2).
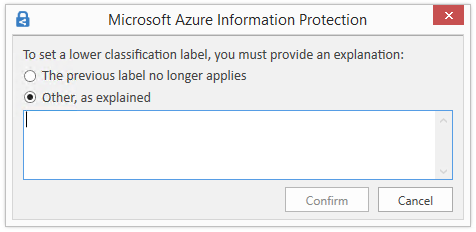
Figure 2. You can require that users supply a justification if they lower the classification label.
Enable recommended labels in Azure Information Protection to provide guidance for users on how to label a document based on its content (Figure 3). This recommendation is based on the conditions that you define. For example, if Azure Information Protection detects credit card numbers in a document, you could define policies that recommend that the user label it as “Confidential.”
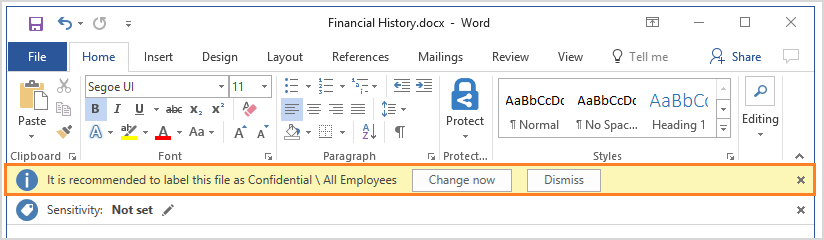
Figure 3. Azure Information Protection can be configured to recommend labels based on the information detected in the document.
You can also define conditions that, if matched, will apply the corresponding label automatically with no user involvement, and you can configure the Azure Information Protection scanner and Microsoft Cloud App Security to scan, classify, and label documents already saved on-premises and in cloud repositories, respectively.
Protect
Several protection actions can be applied to documents and emails based on sensitivity label, including applying encryption, rights restrictions, or visual markings (such as headers or footers). To encrypt files based on classification label, you will need to set up usage rights based on role. Azure Information Protection includes the following predefined roles:
- Viewer: Allows users to view the data and nothing else.
- Reviewer: Allows users to edit the data but NOT copy information out or change the protection applied.
- Co-Author: Allows users to edit the data AND copy information out but NOT change the protection applied.
- Co-Owner: Allows users to have Full Control that also allows users to copy and change/remove protection and change the Azure Information Protection label.
You’ll need to determine the type of protection that will be applied and the users that can access specific types of content. We recommend using sub-labels to define the audience of the content and the usage rights available to that audience. The Azure Information Protection—Deployment Acceleration Guide describes this concept in more detail with tips on how to apply it to your organization.
Monitor and remediate
Azure Information Protection Analytics gives you tools to view the state of your sensitive information, including the volume of labeled and protected files and emails, the application used to apply the label, the location of sensitive files, and the type of data that was detected (Figure 4). We recommend using the Azure Information Protection Analytics dashboards to see detailed information on information protection activities. This provides rich usage and activity data but requires consumption on an Azure subscription that incurs an additional cost based on usage.
Reporting data can help you refine the policies that you’ve established for labeling and protecting documents and identify potential risky behavior or over-sharing. Plan to regularly revisit your Azure Information Protection policies to optimize for your users and data needs.
Deploying Office 365 ATP
Bad actors continue to use email as a primary method for gaining initial access to your organization. Phishing and malware campaigns have increased in sophistication, increasing the chances that one or more of your users will accidentally provide their credentials or open an attachment that gives hackers access. Set up Office 365 ATP to protect against advanced attacks such as phishing and zero-day malware.
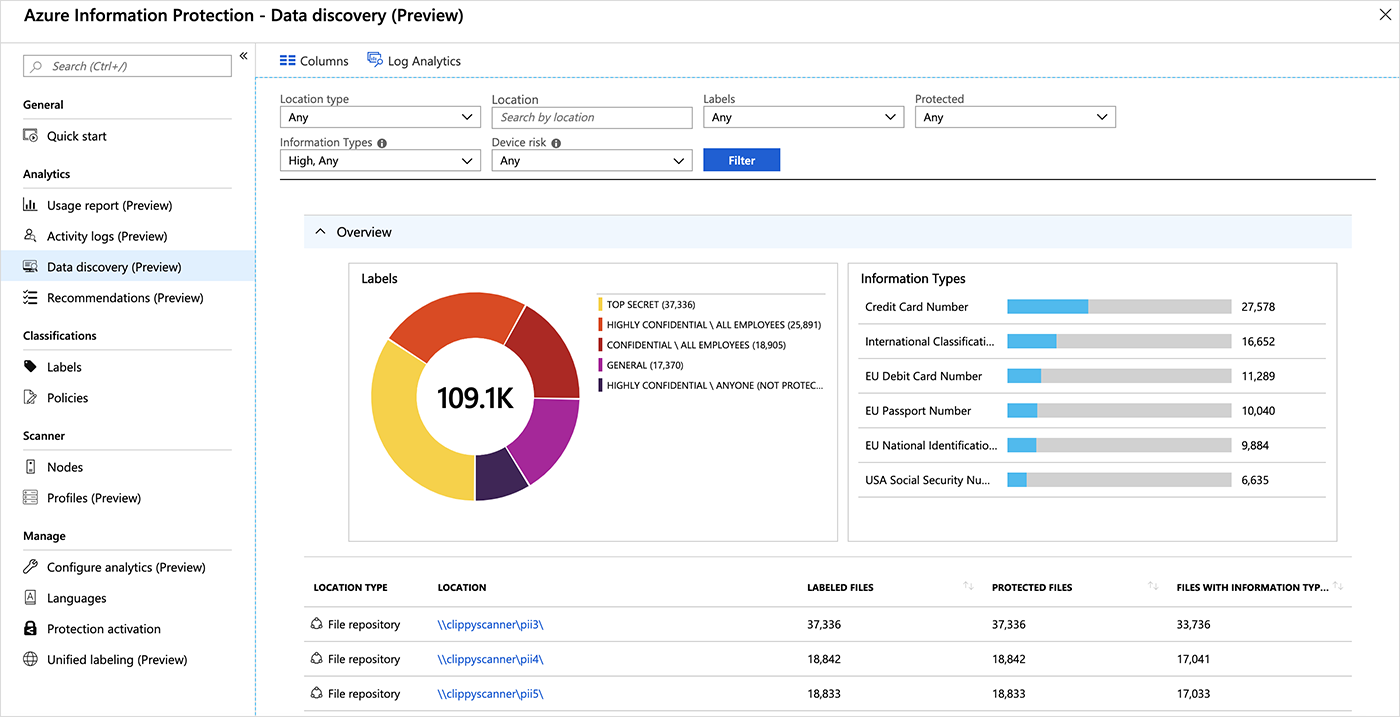
Figure 4: The Data discovery dashboard provides information on the location of sensitive data within your organization.
To get started, you’ll need to set up policies for the following:
- Anti-phishing
- Safe Links
- Safe Attachments
Anti-phishing policies
When you enable anti-phishing in Office 365 ATP, machine learning models trained to detect phishing messages are applied to every incoming message. Anti-phishing polices are designed to protect against email spoofing, impersonation, and compromised email accounts. Additionally, Office 365 ATP learns how each individual user communicates with other users inside and outside the organization and builds a map of these relationships. This map allows Office 365 ATP to understand more details about how to ensure the right messages are identified as impersonation. Anti-phishing policies can be added, edited, and deleted in the Office 365 Security & Compliance Center. Each organization in Office 365 has a default anti-phishing policy that applies to all users. You can create custom anti-phishing policies that you can scope to specific users, groups, or domains within your organization.
Safe Links policies
When a user clicks a link in an email or document, Office 365 ATP Safe Links scans the website or the reputation of the link and determines if it is safe or malicious. Based on the ATP Safe Links policies configured, users will either be able to open the link, receive a warning, or be blocked from accessing it.
Safe Attachments policies
The Office 365 ATP Safe Attachments scans email attachments and files in SharePoint Online, OneDrive for Business, and Microsoft Teams to determine if they are malicious. Once identified as malicious, the file is blocked, replaced, or delivered based on the ATP Safe Attachments policies configured.
ATP Safe Attachments policies can be configured to:
- Block emails with malicious attachments from proceeding.
- Deliver messages immediately while the attachment is scanned in the background.
- Remove detected malware from emails and notify the user.
Take a look at our best practices for configuring Exchange Online Protection for more tips on blocking unwanted emails from reaching your users.
Learn more
Check back in a few weeks for our next blog post, “Step 9: Protect your OS,” which will give you tips for configuring Windows Defender Advanced Threat Protection to block new and emerging threats on Windows 10.
Get deployment help now
FastTrack for Microsoft 365 provides end-to-end guidance to set up your security products. FastTrack is a deployment and adoption service that comes at no charge with your subscription. Get started at FastTrack for Microsoft 365.
Resources
READ MORE HERE